User Manual - Professors
User Manual - Professors
- Starting Up
- Creating Courses
- Managing Course Details
- Creating Questions
- Managing Groups
- Creating Sessions
- Running Sessions
- Viewing Responses
- Grading Responses
Starting Up
To obtain an account with professor privileges, another professor with promoting privileges or and administrator must promote your account.
Giving others access to a professor account
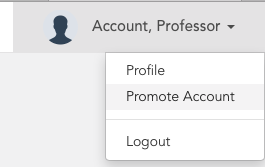
Some professors can promote other accounts to professor (administrators can give this right to a professor acccount). If your account can promote others to professor, access the account promotion menu from the top right of the nav bar.
Enter an email address of someone with a student account. Their account will be converted to a professor account.
An professor account can create courses and run sessions within their course.
Creating Courses
There are two ways to create a course; first is by going to the Qlicker Home page once you are logged in and clicking ‘Create Course’, and second is by selecting ‘Courses’ in the navigation bar, then ‘All Courses’, and clicking ‘Create Course’.
Enter the following information in the prompt (all fields are required):
- Name: The name of the course
- Department Code: The course’s department code (ex. PHYS)
- Course Number: The number of the course (ex. 106)
- Section: The course’s section (ex. 001)
- Semester: The current semester (ex F16)
You can modify these values later.
Navigating Courses
You can change which course you are currently in through the Qlicker Home page, the Courses page, and through the dourse dropdown at the top of the page.

The main course page (Course Home) will give you an overview of the course, and allow to make course-level changes.
Managing Course Details
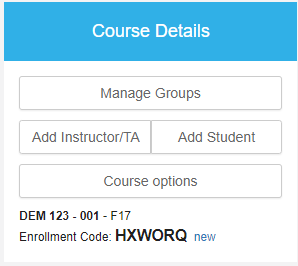
The course details section of the main course page allows you to change several aspects of the course.
Managing Groups
This button will bring you to a page that allows different categories of groups to be made, and to place students in those groups. Currently, the ability to place students in groups is useful when manually grading student submissions (e.g. short answers). The main use case is to group students by TA, so that each TA can be responsible for grading a subset of students.
Adding Teaching Assistants/Instructors To Your Courses
To add a TA to your course, select ‘Add Instructor/TA’ and enter their Qlicker email. TAs are student accounts that have all the same privileges as professors, except modifying the course options and changing the course enrollments (TA and student).
Adding students to the course
The main mechanism for students to enroll in a course is for them to go to their home page on Qlicker and add the enrollment code for the course (which you can change by clicking on “new”).
Additionally, you can directly add a student to your course by selecting ‘Add Student’, and entering their Qlicker email.
Once there are students enrolled, the “Classlist” section will populate, from which you can also remove students.
Course options
The Course options button will open a dialog allowing you to modify the name of the course, as well as turn on/off certain features.
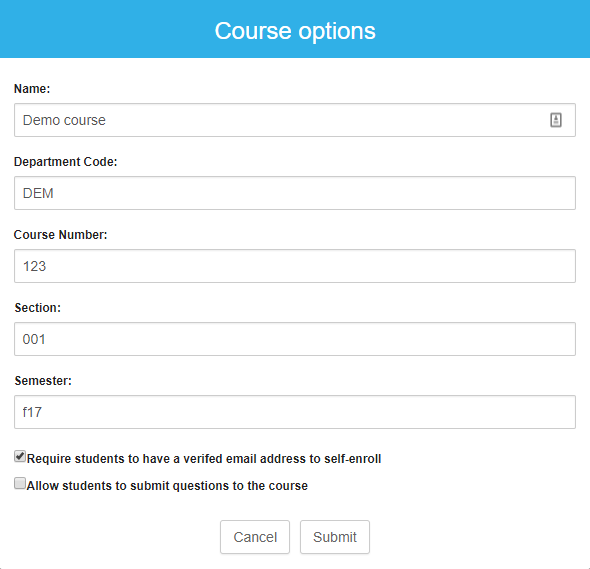
It is strongly recommended that you require students to have a verified email address in order to self-enroll into the course (this is the default).
You can also allow students to submit questions to a question library for the course. Student questions are “unapproved” by default, and must be approved by a TA or Professor before they will show up in the course question library or the course public library.
Creating Questions
Questions can either be created within a session or by going to the Questions Library via ‘My Question Library’ in the ‘Questions’ dropdown menu. Click ‘New Question’ to create a question.
The question edit form will show up.
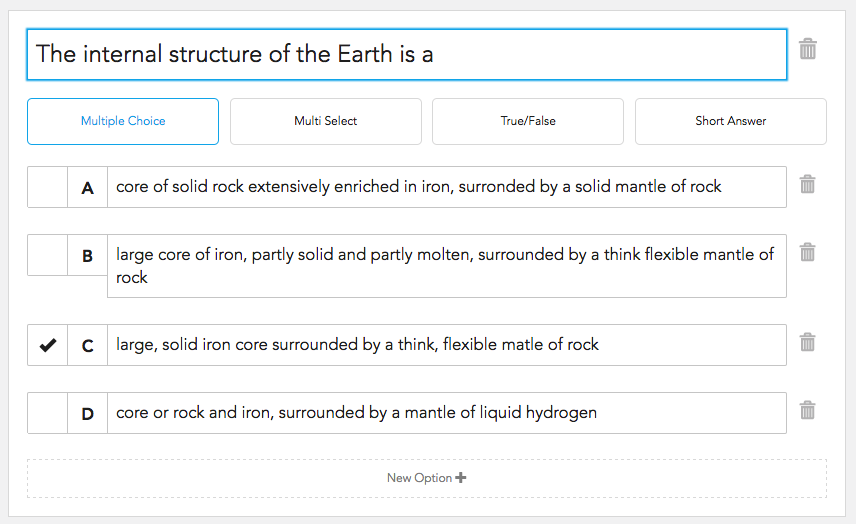
- Question Field This is where the question text is entered. The text can be modified using the toolbar above the form.
- Answers: There are four different questions types. See below for more details.
- Solution: This is where the full solution text is entered. The text can be modified using the toolbar above the form.
If you are editing they question in your Question Library, you’ll see the following items.

- Duplicate: This button creates a copy of the question
- Delete: This deletes the currently selected question
- Share: This displays an interface for sharing a question with another user. To do this you need to input the user’s email. You can also share questions with yourself to use in other courses.
- Private: Private questions can only be viewed by your account.
- Public: Public questions can be viewed by any user in the course. Note: a question cannot be both private and public.
- Question Tags: Tags can be added to the question to make searching and selecting questions easier.
Each edit created will automatically save the question.
Question Types
There are four question types to choose from; multiple choice, multi-select, true or false, and short answer. For multiple choice and multi-select, there can be a max of 6 answers to choose from. Like question text, the answers can be modified using the toollbar. Correct and Incorrect options can be toggled by clicking on the checkbox to the right of each answer.
Using the Question Library
The Question Library can be found via the ‘Question Library’ button at the top of the page. This page contains all questions saved to the library, for all courses you own. On this page, you can create new questions, search for questions using keywords, type, or tags, and access Public questions, Student-submitted questions, and question shared with you.
You can also import and export questions in your library to save locally. To export questions, click ‘Export’. This will download a json file containing the data of all of the questions in your library. To import questions, click ‘Import’. This will ask for a file of the same format, and populate your library with questions from the file.
Public Questions
Public questions can be accessed by clicking ‘Public Questions’ at the top of the Question Library page. Public questions are all questions submitted by other users that were marked as public. These questions can be searched using keywords, question type, and tags.
To copy a public question to your library, select the desired question from the list and click ‘Copy to Library’ above the question preview. The copied question can now be modified, and used in your sessions.
Student Submissions
Student-submitted questions can be accessed by clicking ‘Student Submissions’ at the top of the Question Library page. Student-submitted questions are automatically tagged with the department code and course number of the course they submitted the question to. These questions can be searched using keywords, question type, and tags. By default, if an instructor has not approved or made the student question public, the student retains ownership of the question, allowing them to delete it. If you have unapproved questions, the student submissions category will not exist, since student questions will automatically be in the public category.
To copy a student-submitted question to your library, select the desired question from the list and click ‘Approve for course’ above the question preview. The copied question can now be modified, and used in your sessions. The question submitted by the student will be associated with a course (not just because of the tag). By copying it to your library, you are “approving it” for the course, so it will also show up in the library of all instructors for the course, who will be allowed to modify it.
By copying the question, you preserve the information about who created the question, but you take over the ownership. The student that originally submitted the question, can still see the question, and any edits that you make to it. If you un-approve the question, it will no longer show up for the other instructors in the course. If you subsequently delete it, this will remove it from your library by switching the ownership back to the original student.
You can also make a student submission public. This will also transfer the ownership to you, preventing the student from deleting the question, and will “approve the question”. If you copy it to your library, a copy is made, and since it is approved for the course, all instructors of the course will be able to see it and edit it.
lastly, you can choose to delete a submission. This will remove the question from the database.
Managing Groups
Course groups are a efficient way of organizing students in your course. To create/edit groups, click ‘Manage Groups’ on the course home page.
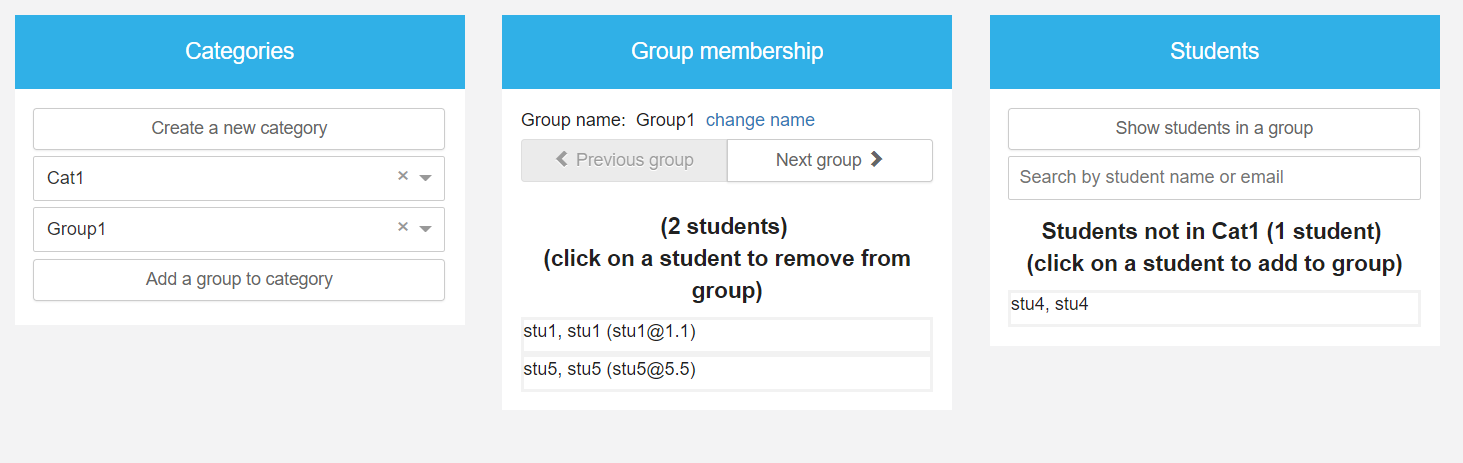
On the manage groups page, create a new category with a name and a number of groups. To select a group to edit, toggle through the ‘Group Membership’ bar. Add a student to the selected group by clicking on a student in the ‘Students’ sidebar, and remove a student by clicking on a student in the ‘Group Membership’ bar. You can also add additional groups to the category by selecting ‘Add a group to category’.
Creating Sessions
Course sessions are the means of getting the questions out to your students. To create a session, go to the course’s main page and click ‘Create Session’. To get to the course main page, select the desired course in either the Qlicker Home page, the Courses page, or the ‘Courses’ dropdown menu.
Enter the following information in the prompt:
- Name: The name of the session. We would recommend naming it by the date you’re expecting to run this session.
- Description: A description of the session.
The created session will show up under the “Sessions” section as a draft.
Editing Sessions
To edit a session, select the session under the “Sessions” section of the course main page. This will bring you to the Edit Session page.
The intial view shows the current questions assigned to the session and various options for the session. These options include running the session, assigning a date to the session, changing the name or description of the session, adding tags to the session, and labelling the session as either a Draft - where student’s cannot see it, Upcoming - where student’s can see it, but not interact with it, Live, or Inactive. Questions existing in the session can be removed, duplicated, copied to your library, and dragged to change the order.

You can also add new questions directly to the session from this view, and copy all questions in the session to your library from the ‘Copy All Questions to Library’ button.
Selecting ‘Question Library’ brings up a list of all questions in your library. You can also select Public Questions, or Student Submissions from the first dropdown selection. Questions can be searched by keyword, type, or tag. To add an existing question to the session, click on the desired question in the list and it will be copied into the session.
Copying Session
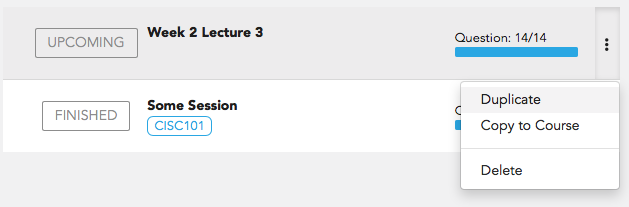
Once sessions are populated in the “Sessions” section, you can delete the session, duplicate it to the current course, and copy it to another course you own.
Running Sessions
Running a session means that students are able to interact with and contribute responses to the session. To run the session, go to the Edit Session page and click ‘Run Session’.
The current view shows an aggregation of response results and a question preview of the current session underneath a toolbar. The toolbar includes an indication of how many students are active in the session, how many students responded to the current question, and various actions. The results will auto-update once students submit responses.
The current question can be toggled either by selecting the desired question in the question list, or by clicking ‘Previous’ or ‘Next’ to move one question ahead or behind the current question.

In order from left to right starting at the top, the toolbar contains:
- Session Name
- Participants: Current number of students active in the session.
- Finish Session: This closes the session. Session results can now be viewed.
- Presentation Mode: See below.
- 2nd Display: See below.
- Previous: Displays the question before the current question.
- Next: Displays the question after the current question.
- Question: Displays the current question, out of all questions listed in the session.
- Answered: Current number of submissions to the current question, out of all students active in the session.
- Hide Question: Students will be unable to see the current question.
- Show Correct: The question display, both on your screen and the students, will display the correct answer(s) in green text and the incorrect answer(s) in red text, as well as the solution to the question.
- Show Stats: The question display, both on your screen and the students, will display the current statistics (percentage answered for each option) of the current question
- Attempt: Displays the current attempt for the current question.
- Disallow Responses: This disallows students to submit any more answers to the current question.
- New Attempt: This allows you to ask the same question again, with a new set of responses.
To end the session select ‘Finish Session’. This changes the session to Finished, and results and statstics from the session can be viewed either by clicking ‘Review Session Results’ under the “Sessions” section in the course’s main page, or by selecting ‘Response Results’ in the nagivation bar and choosing the desired course.
Presentation Mode
Presentation Mode is for when your current display is visible by the students. This mode hides the Question sidebar and the results of the current question. To toggle this mode, select ‘Presentation Mode’ in the toolbar.
Dual Display Mode
Dual Display Mode is to be used when there is a second screen used to display information. To toggle this mode, select ‘2nd Display’. A second window will open with only the current question displayed. You can then use this on a second display.
Viewing Responses
There are two ways to review session results; one is to select ‘Grades’ from the navigation bar. The second way is to go to the course home page and select ‘Review Session Results’.
Note: The finished sessions will be marked in red if no review is allowed. To allow students to review their session results, select ‘Allow Review’ from the session item.
The current view showcases the percentage of questions answered by each student per session. To see the results per session, click ‘Participation by Session’. This view displays each session that has results with the number of students that were active in the session, and a list of questions and the number of responses each question received. Clicking on each individual question shows a table with all students that answered the question and a graph showing the distribution of the answers received.
Viewing the Full Course Grades
From the ‘Grades’ page, you can view the full table of student grades. From here you can view each student’s full participation grade and their participation/grade for each session.

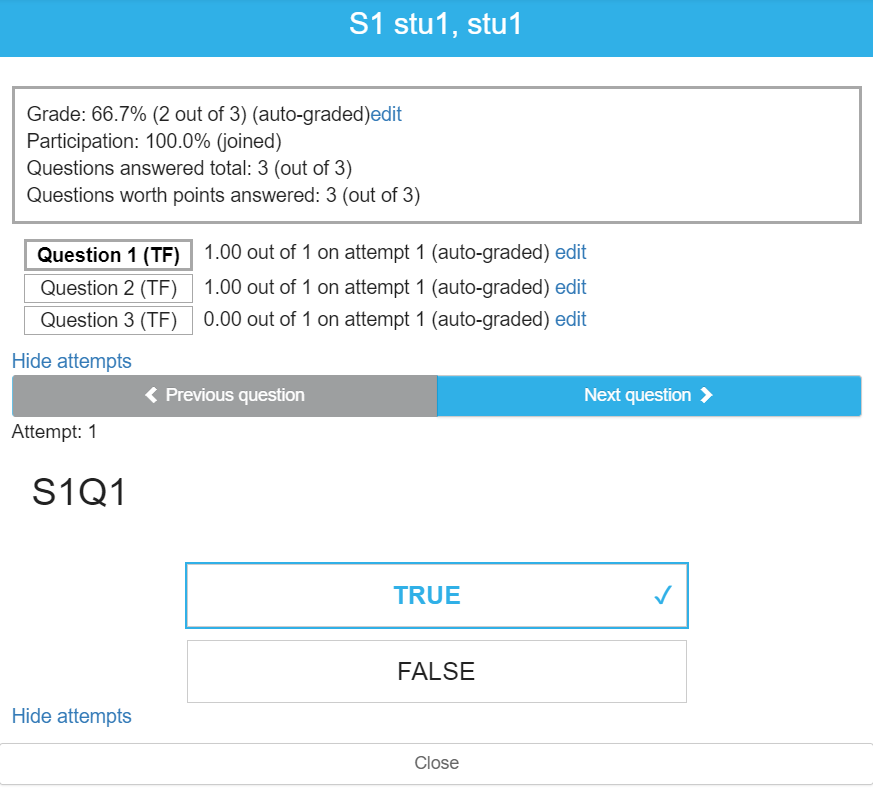
Selecting a grade from a session will show the grade details, including the grade for each question, controls to edit the grade, and the attempts for each question.
From this page you can also export the Course grades to a csv file by selecting ‘Export as .csv’.
Grading Responses
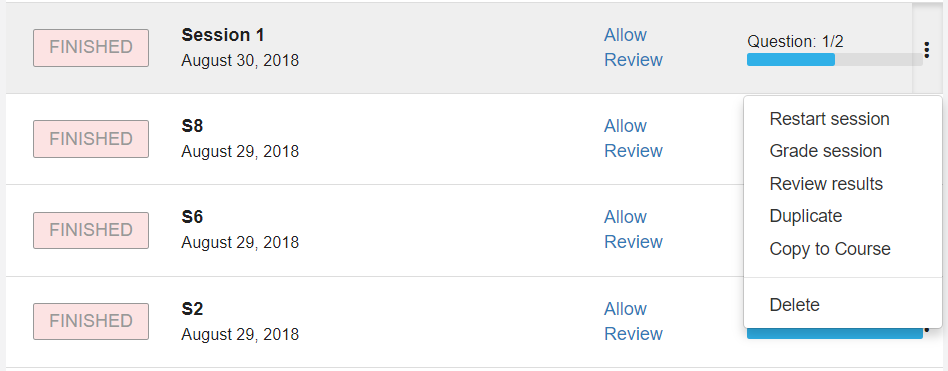
To grade responses to a session, go to the course home page and select ‘Grade Session’ from the session options.
On this page you can view student responses and edit response grades. To view a student’s response, scroll down until you find the student, or click on the student’s name on the sidebar. You can also filter students via groups, their name, or email on the sidebar. To grade a response, change the given grade, enter feedback, and click ‘Save Mark’.
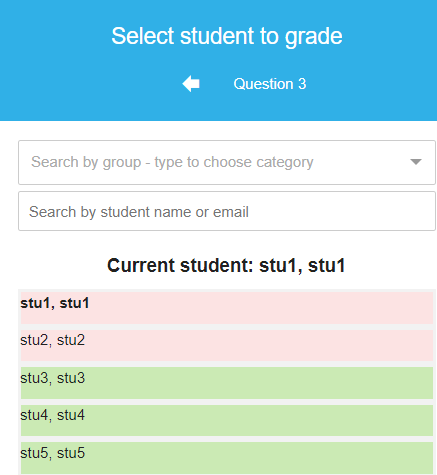
On the sidebar, students which have been graded are coloured green, while students which have not been graded are coloured red. By default, all questions are marked automatically aside from short answer questions.